The best way to show videos that are owned by you on your blog is to play the video through Brightcove. This is our campus cloud storage for video.
Uploading your video to Brightcove can be done through the Wes Portal using the Wesleyan Video Uploader. When the video is uploaded Brightcove will provide you with a 13 digit video Id number.
WordPress has changed editors in version 5.0+. This means there is a new way of embedding.
Click the link below for the instructions you need:
Block Editor (Available in WordPress 5.0)
Classic Editor
Block Editor
Step 1
Login to your blog’s dashboard and edit a post.
Step 2
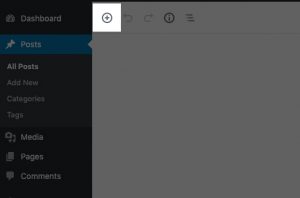
Click the + sign to add a Brightcove Embed Block.

Step 3
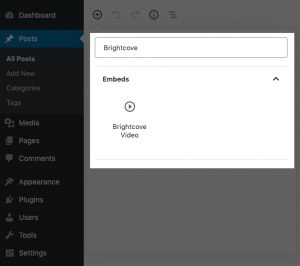
Either browse for Brightcove Video under the Embeds block or use the search to find “Brightcove Video”. If you can’t find it, please contact your web administrator to make sure this is installed. Click the Brightcove Video icon. You have now created the video block!

Step 4
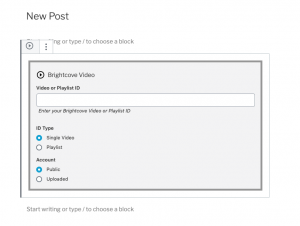
Fill in the information for the block so you can pull in the right video or playlist. Enter or paste your Brightcove video ID or Playlist ID in the Video or Playlist ID field. For the ID Type, Select whether the ID is a playlist id or video id. For the Account field, leave the drop down as Public if the video was produced for you or taken from video.wesleyan.edu. If you uploaded the video through video-upload.wesleyan.edu, select User Uploaded (UGC) from the Account drop down.

Step 5
You are done! You should see the video in the preview or when you publish. If you do not, please check your information to make sure it is correct.
Classic Editor
Step 1
Login to your blog’s dashboard.
Activate the Brightcove Video Embed plugin.
— If you do not see the video camera icon in step 1, you have not installed the plugin.
Step 2
Click the editor where you would like the video to be placed. Then, find the video icon in your editor and click it. If you have a Brightcove video ID, select Single Video. If you have a playlist ID, select Playlist.
Step 3
Enter or paste your Brightcove video ID in the ID field. For the Account field, leave the drop down as Public if the video was produced for you or taken from video.wesleyan.edu. If you uploaded the video through video-upload.wesleyan.edu, select User Uploaded (UGC) from the Account drop down. Click OK when done.

Step 4
You’re finished! You should see a short code in the editor. This is where the video will appear. You can move this short code around if you wish.


